
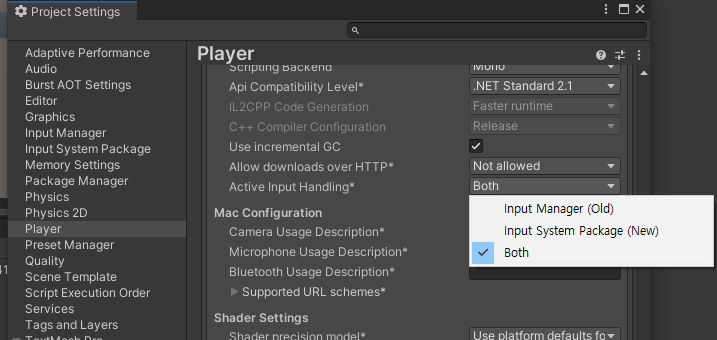
레거시 Input 클래스
-다양한 입력장치로의 전환이 어려움
-Update 함수에 작성해 성능 상 불리함
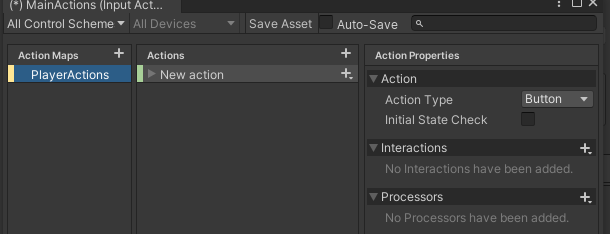
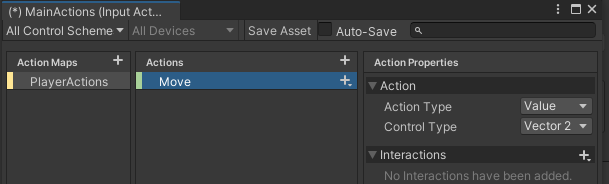
새로운 Input System
-Input Actions 에셋을 생성해 입력값을 정의하고 할당
-Input Actions => Actions Maps, Actions, Properties로 구분
-패키지 매니저로 설치
Action
-게임 내의 행동, 즉 동작
Binding
-Action을 실제 물리적인 입력장치와 매핑하는 것
https://docs.unity3d.com/Packages/com.unity.inputsystem@1.0/manual/ActionBindings.html
Input Bindings | Input System | 1.0.2
Input Bindings An InputBinding represents a connection between an Action and one or more Controls identified by a Control path. An Action can have an arbitrary number of Bindings pointed at it. Multiple Bindings can reference the same Control. Each Binding
docs.unity3d.com
Input Action에셋
-Assets>Create>InputAction으로 생성

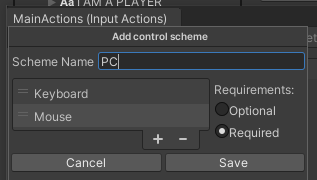
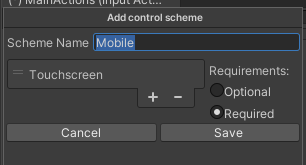
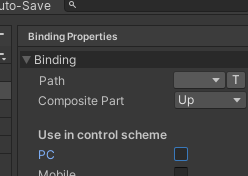
-새로운 스키마 생성
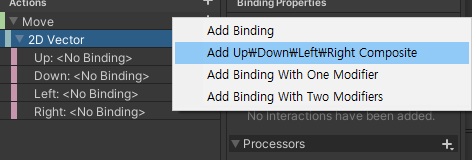
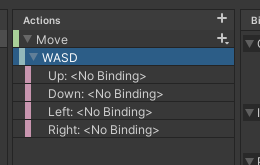
-<No Binding>은 아직 연결정보를 설정하지 않았다는 것
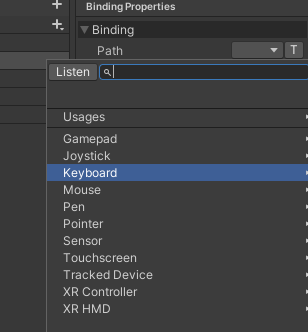
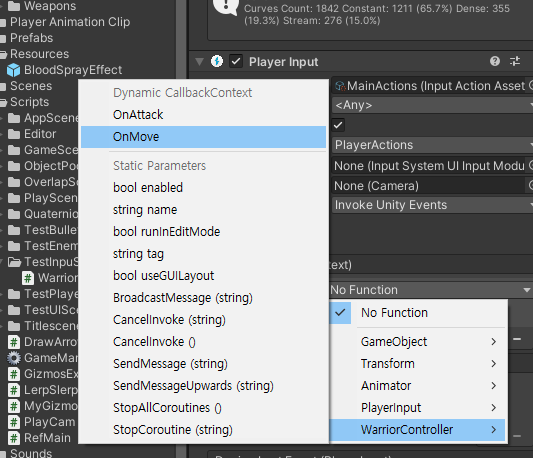
-바인딩 정보를 연결 방법: 계층구조에서 직접 선택, Listen 버튼, T버튼
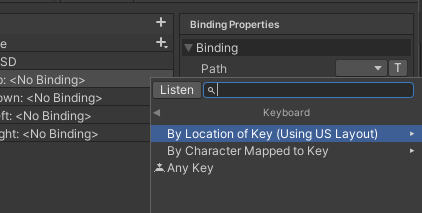
직접 선택) Keyboard -> ByLocation of Key(Using US Layout) -> W
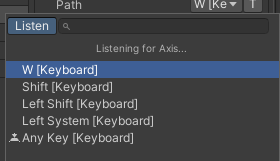
Listen버튼) 누르면 입력 대기 상태가 되며 키를 입력하면 바인딩 목록에 나온다.
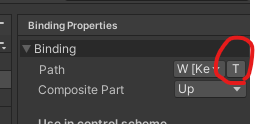
T버튼) 직접 텍스트로 입력
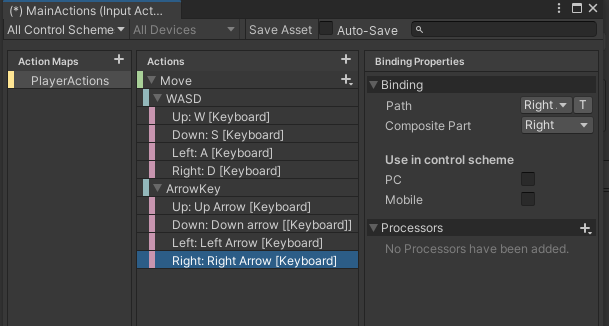
Save Asset으로 저장한다.
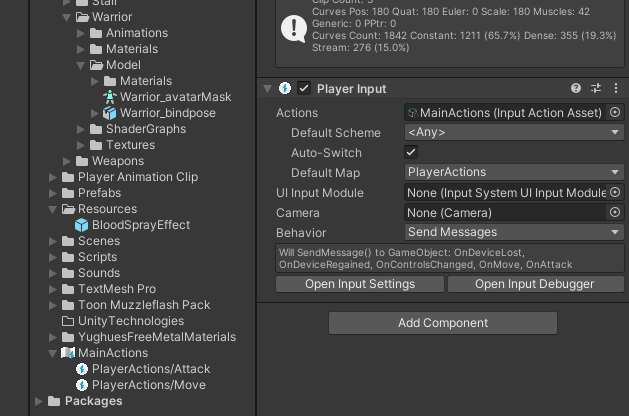
플레이어에 Player Input 컴포넌트를 추가 후 Actions에 MainActions를 넣어준다.
Behavior 속성
-액션이 발생했을때 코드의 함수를 어떻게 실행시킬 것인지 결정
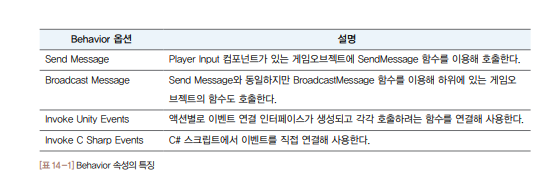
Behavior-Send Message 옵션
void On{액션명}()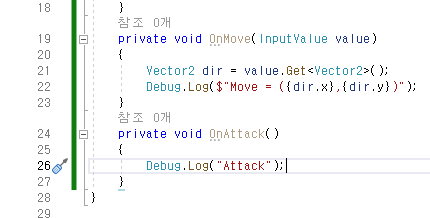
Behavior - Invoke Unity Evenets 옵션
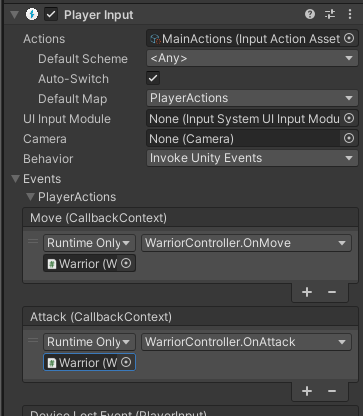
-CallbackContext라는 파라미터 타입이 표시된다.
-입력값은 ReadValue<t>() 함수를 통해 받는다.
-CallbackContext.phase 속성은 Input Actions에 정의한 액션이 어떤 상태로 호출되었는지 나타낸다.
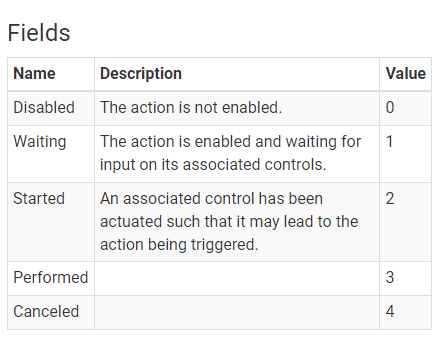
Enum InputActionPhase | Input System | 1.0.2
Enum InputActionPhase Assembly : solution.dll Syntax public enum InputActionPhase Fields Name Description Value Disabled The action is not enabled. 0 Waiting The action is enabled and waiting for input on its associated controls. 1 Started An associated co
docs.unity3d.com
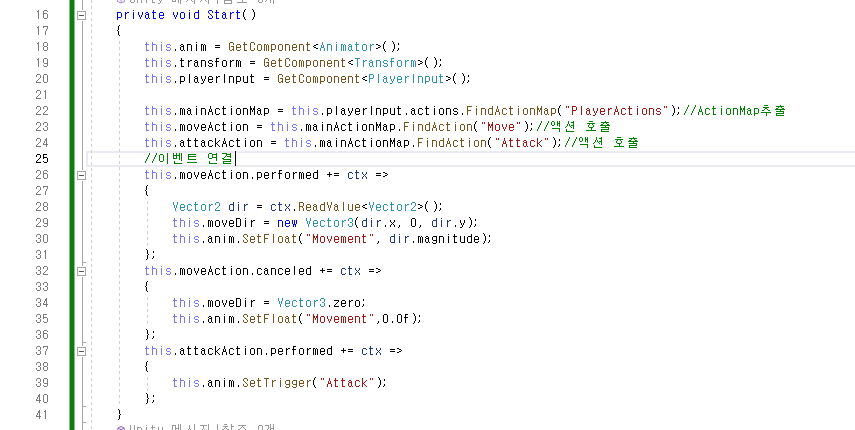
Behavior - Invoke C Sharp Events 옵션
-c# 스크립트에서 이벤트를 연결해 사용하는 방식
using System.Collections;
using System.Collections.Generic;
using UnityEngine;
using UnityEngine.InputSystem;
public class WarriorController : MonoBehaviour
{
private Animator anim;
private new Transform transform;
private Vector3 moveDir;
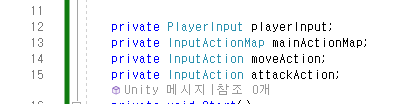
private PlayerInput playerInput;
private InputActionMap mainActionMap;
private InputAction moveAction;
private InputAction attackAction;
private void Start()
{
this.anim = GetComponent<Animator>();
this.transform = GetComponent<Transform>();
this.playerInput = GetComponent<PlayerInput>();
this.mainActionMap = this.playerInput.actions.FindActionMap("PlayerActions");//ActionMap추출
this.moveAction = this.mainActionMap.FindAction("Move");//액션 호출
this.attackAction = this.mainActionMap.FindAction("Attack");//액션 호출
//이벤트 연결
this.moveAction.performed += ctx =>
{
Vector2 dir = ctx.ReadValue<Vector2>();
this.moveDir = new Vector3(dir.x, 0, dir.y);
this.anim.SetFloat("Movement", dir.magnitude);
};
this.moveAction.canceled += ctx =>
{
this.moveDir = Vector3.zero;
this.anim.SetFloat("Movement",0.0f);
};
this.attackAction.performed += ctx =>
{
this.anim.SetTrigger("Attack");
};
}
private void Update()
{
if(moveDir != Vector3.zero)
{
this.transform.rotation = Quaternion.LookRotation(moveDir);//진행방향으로 회전
this.transform.Translate(Vector3.forward*4.0f*Time.deltaTime);//이동
}
}
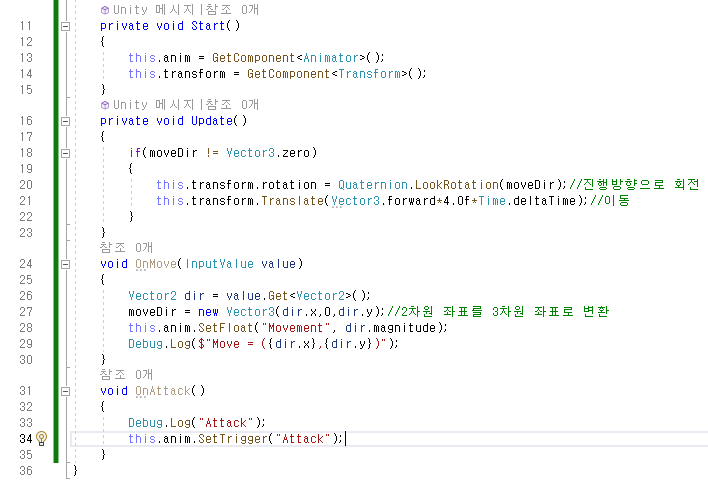
#region sendMessage
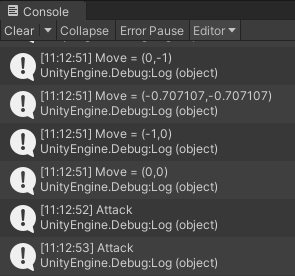
void OnMove(InputValue value)
{
Vector2 dir = value.Get<Vector2>();
moveDir = new Vector3(dir.x,0,dir.y);//2차원 좌표를 3차원 좌표로 변환
this.anim.SetFloat("Movement", dir.magnitude);
Debug.Log($"Move = ({dir.x},{dir.y})");
}
void OnAttack()
{
Debug.Log("Attack");
this.anim.SetTrigger("Attack");
}
#endregion
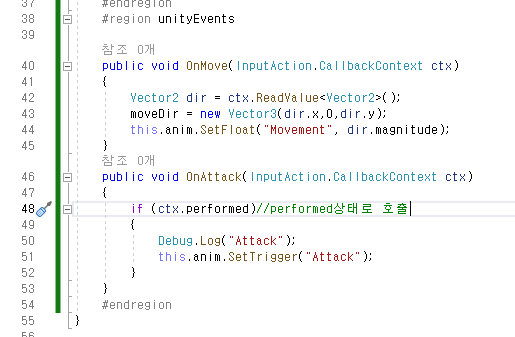
#region unityEvents
public void OnMove(InputAction.CallbackContext ctx)
{
Vector2 dir = ctx.ReadValue<Vector2>();
moveDir = new Vector3(dir.x,0,dir.y);
this.anim.SetFloat("Movement", dir.magnitude);
}
public void OnAttack(InputAction.CallbackContext ctx)
{
if (ctx.performed)//performed상태로 호출
{
Debug.Log("Attack");
this.anim.SetTrigger("Attack");
}
}
#endregion
}Direct Binding
-PlayerInput 컴포넌트 없이 직접 스크립트에서 InputAction을 생성하고 액션을 정의할 수 있다.
1. 액션 만들기
2. 바인딩
using System.Collections;
using System.Collections.Generic;
using UnityEngine;
using UnityEngine.InputSystem;
public class WarriorDirectController : MonoBehaviour
{
private InputAction moveAction;
private InputAction attackAction;
private Animator anim;
private Vector3 moveDir;
void Start()
{
this.anim = this.GetComponent<Animator>();
//1. 액션 만들기
this.moveAction = new InputAction("Move", InputActionType.Value);
this.attackAction = new InputAction("Attack", InputActionType.Button);
//2.바인딩
//move action binding
InputActionSetupExtensions.CompositeSyntax syntax = this.moveAction.AddCompositeBinding("2DVector");
syntax = syntax.With("Up", "<Keyboard>/w");
syntax = syntax.With("Down", "<Keyboard>/s");
syntax = syntax.With("Left", "<Keyboard>/a");
syntax = syntax.With("Right", "<Keyboard>/d");
//attack action binding
this.attackAction.AddBinding("<Keyboard>/space");
//3.이벤트 붙이기
//이동
this.moveAction.performed += (context) => {
var dir = context.ReadValue<Vector2>();
Debug.Log(dir);
this.moveDir = new Vector3(dir.x, 0, dir.y);
//애니메이션 실행
this.anim.SetFloat("Movement", dir.magnitude);
};
//멈출때
this.moveAction.canceled += (context) => {
this.moveDir = Vector3.zero;
//애니메이션 실행
this.anim.SetFloat("Movement", 0);
};
//공격
this.attackAction.performed += (context) => {
Debug.Log("attack");
//애니메이션 실행
this.anim.SetTrigger("Attack");
};
//4. 활성화
this.moveAction.Enable();
this.attackAction.Enable();
}
// Update is called once per frame
void Update()
{
if (this.moveDir != Vector3.zero) {
//회전
this.transform.rotation = Quaternion.LookRotation(this.moveDir);
//이동
this.transform.Translate(Vector3.forward * Time.deltaTime * 4.0f);
}
}
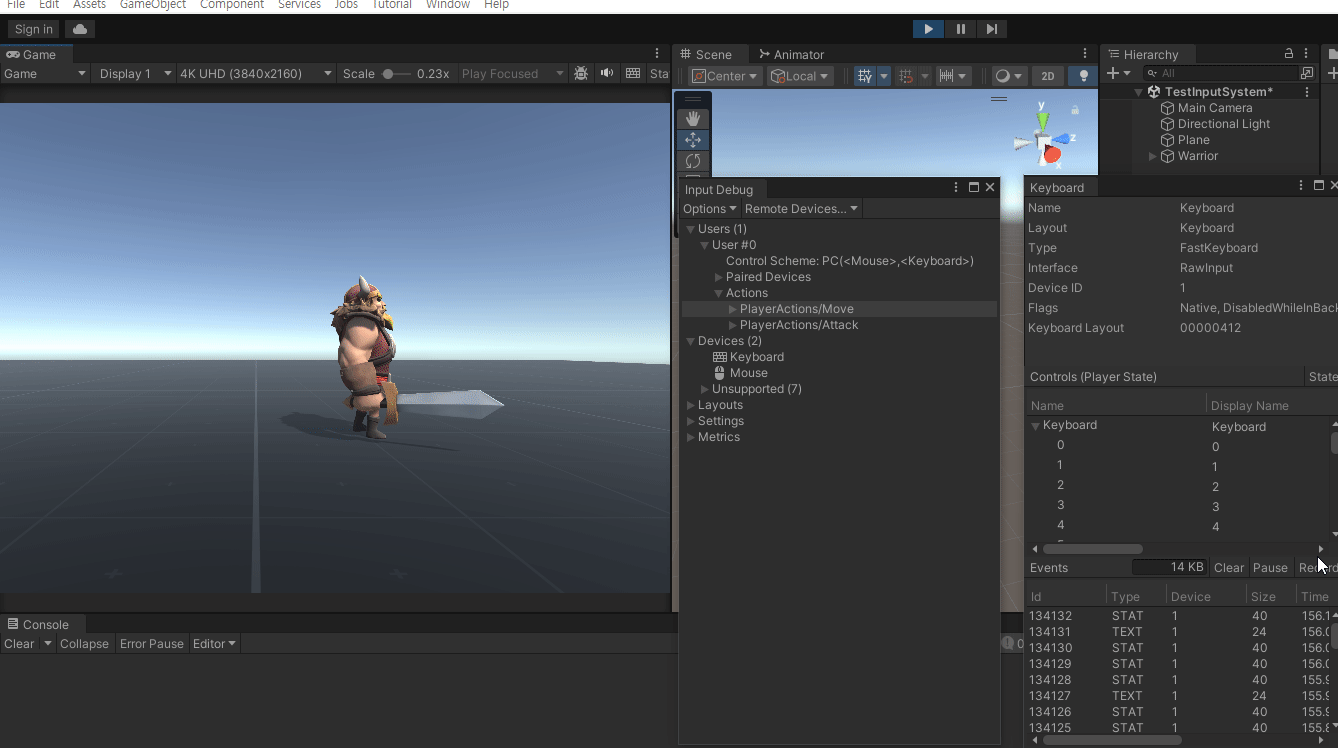
}Input Debug
-입력장치로부터 전달되는 값을 모니터링 할 수 있는 기능


'유니티 심화' 카테고리의 다른 글
| [UGUI 연습] LearnUGUI- Closure,캡처/ 토글 버튼 생성, CheckBox, Tab, UISlider (0) | 2023.09.04 |
|---|---|
| 썸네일 만들기 + 데이터 관리 (0) | 2023.09.03 |
| SceneManager클래스- LoadSceneAsync, LoadSceneMode.Additve/Single (0) | 2023.08.30 |
| 라이트 매핑(Light Mapping) (1) | 2023.08.30 |
| Raycast-총알 발사 로직 수정/ 동적 장애물-NavMeshobstacle (0) | 2023.08.29 |
![[UGUI 연습] LearnUGUI- Closure,캡처/ 토글 버튼 생성, CheckBox, Tab, UISlider](http://img1.daumcdn.net/thumb/C300x300/?fname=https://img1.daumcdn.net/thumb/R750x0/?scode=mtistory2&fname=https%3A%2F%2Fblog.kakaocdn.net%2Fdn%2Fnrdj6%2FbtssPve3Pem%2FkgsIj1j9v63jk8g09asUWk%2Fimg.png)


