


https://www.csharpstudy.com/DevNote/Article/26
C# Closure 이해하기 - C# 프로그래밍 배우기 (Learn C# Programming)
C# Closure 이해하기 [제목] C# Closure 이해하기 Closure란 무엇인가? C#에서 Closure는 어떻게 구현되는가? C#에서 Closure는 어떤 곳에 사용되는가? 이 아티클은 이러한 질문에 대한 답변을 정리한 글이다.
www.csharpstudy.com
-Closure: 람다 안에서 상위 스코프 변수에 접근하는 것을 의미한다.
토글버튼 생성
using System.Collections;
using System.Collections.Generic;
using UnityEngine;
using UnityEngine.UI;

public class Test01UIToggle : MonoBehaviour
{
    public enum eState
    {
        On,
        Off
    }

    //맴버변수
    private eState state;   //기본값은 (E)0이다 eState.On;

    [SerializeField]
    private Button btn;

    [SerializeField]
    private GameObject[] arrOnOff;

    private void Start()
    {
        //var go = this.arrOnOff[(int)this.state];
        //go.SetActive(true);

        this.btn.onClick.AddListener(() => {
            var prevState = this.state;
            //이전상태 게임오브젝트 비활성화
            this.arrOnOff[(int)this.state].SetActive(false);

            //현재 상태를 반전
            if (this.state == eState.On)
                this.state = eState.Off;
            else
                this.state = eState.On;
            Debug.LogFormat("{0} -> {1}", prevState, this.state);
            //현재 상태 게임오브젝트 활성화
            this.arrOnOff[(int)this.state].SetActive(true);
        });
    }
}
체크박스 생성

using System.Collections;
using System.Collections.Generic;
using UnityEngine;
using UnityEngine.UI;
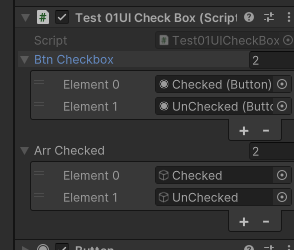
public class Test01UICheckBox : MonoBehaviour
{
public enum eState
{
Checked,Unchecked
}
private eState state;
[SerializeField] private Button[] btnCheckbox;
[SerializeField] private GameObject[] arrChecked;
// Start is called before the first frame update
void Start()
{
foreach (var btn in btnCheckbox)
{
btn.onClick.AddListener(() =>
{
Debug.Log("Clicked");
this.arrChecked[(int)this.state].SetActive(false);//이전상태 게임 오브젝트 비활성화
if (this.state == eState.Checked)
{
this.state = eState.Unchecked;
}
else
{
this.state = eState.Checked;
}
Debug.Log(this.state);
this.arrChecked[(int)this.state].SetActive(true);
});
}
}
// Update is called once per frame
void Update()
{
}
}탭 만들기
(**버튼 추가로 넣어 줄때 자식 컴포넌트에 버튼이 들어가있는지 확인하자. 여러개있으면 충돌한다. 왜 버튼클릭이 안되는지 헤맸는데 자식에 버튼으로 넣어버려서 그런 거였다 ㅜ)
탭 관리는 UI가 복잡해질 수 있으므로 구조를 주의하자.

UIMain의 하위에 Tab을 넣을 영역을 만들어준 후 이름을 UITab이라 하였다.
이 오브젝트는 Tab Controller로 여러개의 탭을 관리한다.
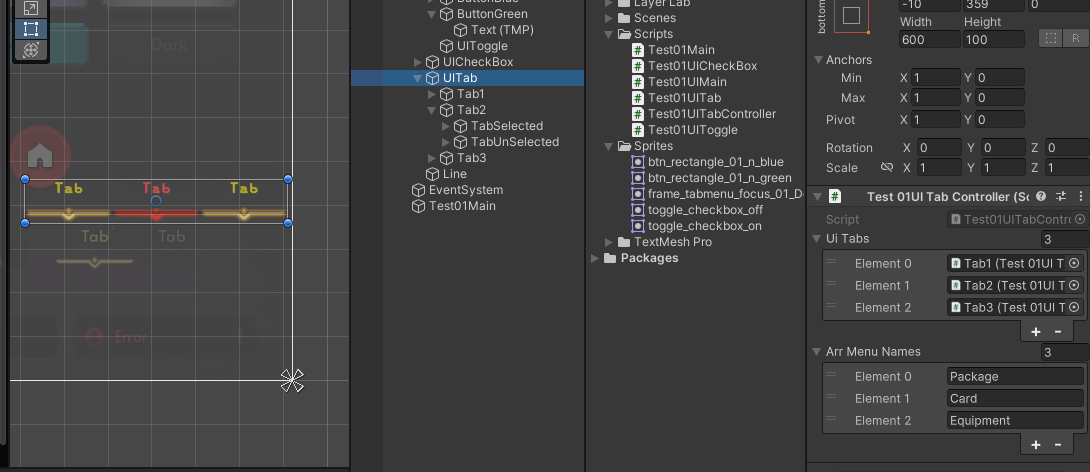


-UITabController는 tab들의 변화를 감지한다고 생각하자. uiTab스크립트에서 btn.onClick이벤트가 발생하면 selectMenu()메서드를 호출한다. 즉 버튼 자체를 누르는지 누르지 않았는지에 대한 것은 uiTab이 알지만, Controller가 메뉴를 고르는 것이다.
각각의 탭들은 UITab.cs를 갖고있다.


using System.Collections;
using System.Collections.Generic;
using UnityEngine;

public class Test01UITabController : MonoBehaviour
{
    public enum eMenuType
    {
        Package,
        Card,
        Equipment
    }
    [SerializeField] private Test01UITab[] uiTabs;
    [SerializeField] private string[] arrMenuNames;

    private eMenuType selectedMenuType;

    public void Init()
    {
        for (int i = 0; i < this.uiTabs.Length; i++)
        {
            int idx = i;
            var uiTab = this.uiTabs[i];
            uiTab.Init(this.arrMenuNames[i]);
           // Debug.Log(uiTabs[i]);
            uiTab.btn.onClick.AddListener(() => {
                Debug.Log(idx);
                this.SelectMenu((eMenuType)idx);
            });
        }

        this.SelectMenu(eMenuType.Package);
    }

    private void SelectMenu(eMenuType menuType)
    {
        foreach (var tab in this.uiTabs)
        {
            tab.UnSelect();
        }

        int idx = (int)menuType;
        var uiTab = this.uiTabs[idx];
        uiTab.Select();

        this.selectedMenuType = menuType;
        Debug.Log(this.selectedMenuType);
    }
}
using System.Collections;
using System.Collections.Generic;
using TMPro;
using UnityEngine;
using TMPro;
using UnityEngine.UI;
public class Test01UITab : MonoBehaviour
{
[SerializeField] private TMP_Text[] arrText;
[SerializeField] private GameObject selectedGo;
[SerializeField] private GameObject unSelectedGo;
public Button btn;
public void Init(string menuName)
{
foreach (var tmpText in this.arrText)
{
tmpText.text = menuName;
}
}
public void Select()
{
this.selectedGo.SetActive(true);
this.unSelectedGo.SetActive(false);
}
public void UnSelect()
{
this.selectedGo.SetActive(false);
this.unSelectedGo.SetActive(true);
}
}UI Slider
https://youtu.be/vl5Pq2_F1Z8?list=PLTFRwWXfOIYA5sIfnHL78hlTU-jwcTLA6


-UISlider의 구조는 위와 같다. Slider 컴포넌트를 UISlider 오브젝트에 넣어주었다.
-Slider 컴포넌트의 FillRect에 Fill오브젝트를 넣어줘야 한다.

https://docs.unity3d.com/2018.3/Documentation/ScriptReference/UI.Slider.html
Unity - Scripting API: Slider
The slider component is a Selectable that controls a fill, a handle, or both. The fill, when used, spans from the minimum value to the current value while the handle, when used, follow the current value. The anchors of the fill and handle RectTransforms ar
docs.unity3d.com

-UIMain에서 uiSlider.onValueChanged를 작성한다. val을 매개 변수로 받아 로그창에 나타낸다.
https://docs.unity3d.com/kr/530/ScriptReference/UI.Slider-onValueChanged.html
UI.Slider-onValueChanged - Unity 스크립팅 API
Callback executed when the value of the slider is changed.
docs.unity3d.com
using System.Collections;
using System.Collections.Generic;
using TMPro;
using UnityEngine;
using UnityEngine.UI;
public class Test01UISlider : MonoBehaviour
{

    [SerializeField]
    private Slider slider;
    [SerializeField]
    private TMP_Text txtMin;
    [SerializeField]
    private TMP_Text txtMax;

    public System.Action<float> onValueChanged;
    public void Init(float min, float max)
    {
        this.slider.minValue = min;
        this.slider.maxValue = max;
        this.txtMin.text = this.slider.minValue.ToString();
        this.txtMax.text = this.slider.maxValue.ToString();

        this.slider.onValueChanged.AddListener((val) => {
            this.onValueChanged(val);
        });
    }
}
using System.Collections;
using System.Collections.Generic;
using TMPro;
using UnityEngine;
using UnityEngine.UI;
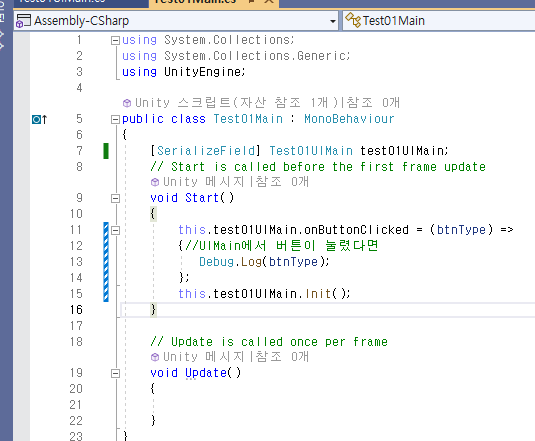
public class Test01UIMain : MonoBehaviour
{
public enum eButtonType
{
Blue,Green
}
public System.Action<eButtonType> onButtonClicked;//버튼이 눌린 것을 UIMain에서 Main에 전달하기 위함
// [SerializeField] private Button btnBlue;
[SerializeField] List<Button> buttonList = new List<Button>();//버튼들을 저장하는 리스트
[SerializeField] Test01UITabController test01UITabController;
[SerializeField] private Test01UISlider uiSlider;
public void Init()
{
//this.btnBlue.onClick.AddListener(() => {
// // Debug.Log("blue button clicked");
// this.onButtonClicked(eButtonType.Blue);
//});
this.test01UITabController.Init();
this.uiSlider.onValueChanged = (val) => {
Debug.LogFormat("[Test01UIMain] onValueChanged: {0}", val);
};
this.uiSlider.Init(8, 16);
for (int i=0; i< buttonList.Count;i++)
{
int index = i; //캡쳐
//Closure: 람다 안에서 상위 스코프 변수에 접근
buttonList[i].onClick.AddListener(() => {
eButtonType buttonType = (eButtonType)index;
this.onButtonClicked(buttonType);
});
}
}
}'유니티 심화' 카테고리의 다른 글
| [UGUI연습] Stage-Complete,Doing,Lock(+Horizontal Layout Group) (0) | 2023.09.05 |
|---|---|
| [UGUI연습]- InputField, PopUpName (0) | 2023.09.05 |
| 썸네일 만들기 + 데이터 관리 (0) | 2023.09.03 |
| Input System -Action, Binding (0) | 2023.08.31 |
| SceneManager클래스- LoadSceneAsync, LoadSceneMode.Additve/Single (0) | 2023.08.30 |
![[UGUI연습] Stage-Complete,Doing,Lock(+Horizontal Layout Group)](http://img1.daumcdn.net/thumb/C300x300/?fname=https://img1.daumcdn.net/thumb/R750x0/?scode=mtistory2&fname=https%3A%2F%2Fblog.kakaocdn.net%2Fdn%2FdoOpXa%2Fbtstbfhct5T%2FK3N8Hk0WrZIkiB98KK14m1%2Fimg.png)

![[UGUI연습]- InputField, PopUpName](http://img1.daumcdn.net/thumb/C300x300/?fname=https://img1.daumcdn.net/thumb/R750x0/?scode=mtistory2&fname=https%3A%2F%2Fblog.kakaocdn.net%2Fdn%2Fcos5Ku%2Fbtss9AFuHFI%2FPH6D6k2F4VFf22uwV5Ie61%2Fimg.png)

